Ever wondered how to build an outdoor kitchen? It's is a great addition to any home that will also give you a way to enjoy more time outside. It's stylish, attractive and will add value to a home. What's better than having friends and family over, sitting out on the patio enjoying a great meal and cold drinks on a balmy summer night?
When considering how to build an outdoor kitchen the first thing you'll need is a place for it. If you have an unused area on your back patio, that's a great way to make use of wasted space.
Countertop Burners
Next map out just how big you want the kitchen to be. Are you looking for a cozy little nook or a grand master chef-worthy prep area? Let's compromise and build something affordable but stylish and useful.
There are a few things you'll need to get started:
Lumber
Plywood
A small refrigerator
Counter top/prep area
Cooking surface
Sink
Proper plumbing and electrical hook ups
So you've laid out your basic outdoor kitchen design. It's time to start building.
The first thing to do is build the basic framework for the kitchen. Use sturdy beams such as 2X4's joined with basic butt joints to frame the whole thing in. Be sure to anchor the base into the patio deck using either concrete anchors or decking screws. Your outdoor kitchen is heavy and the frame has to safely support all the weight. Be sure to add extra support beams along the top to hold the weight of the counter top as well as the cooking surface and sink
Once you've built your framework run your electrical and plumbing connections.
This can be a tricky part so be sure to consult your local building and electrical codes to make sure it's safe. If you are uncomfortable with this, it is wise to hire someone to do this work for you.
Now that you have a place to plug in the fridge and plumbing for the sink you can start decking out the outdoor kitchen.
Nail plywood to the framework while noting where your sink and burner cut outs are located, as well as your fridge cut out.
Use a jigsaw to cut out your sink, cooking area and refrigerator drop ins.
Next, tile the counter top. It's easy to just put down a layer of thin set and lay the ceramic tiles right on top of the plywood.
After you finish that, and the tiles have set, you can drop in your sink, plumb it up, and caulk around the edges.
Plug the refrigerator in and slide it into the cutout you made in the side of the outdoor kitchen. You can then add any kind of decorative molding you want to spiffy up the edges.
The last thing to put in is the cook top.
A wide range of options are available at your local home improvement store. For ease of use an electric griddle top is ideal. Simply insulate around the cook top and place the self contained unit inside your cutout and wire it up.
Now that you've mastered how to build an outdoor kitchen, all that's left to do is call up those friends and family and invite them over for dinner.

Click for larger image and other views
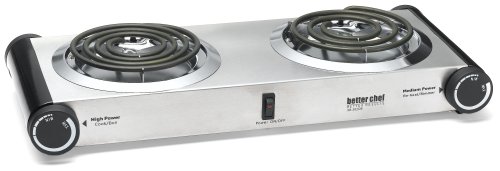
Better Chef Buffet Burner Table Top Dual Feature
- Dual electric buffet burner
- Dual self cleaning coiled heating plates
- Safety on/off switch
- Adjustable temperature thermostat control
- Removable element for easy cleaning
Better Chef Buffet Burner Table Top Dual Overview
Prime Pacific Trading table top dual electric buffet burner. Perfect for kitchens, holidays, trips, crafts, or dorms. This unit has dual self cleaning coiled heating plates. Includes safety on/off switch, adjustable temperature thermostat control, and indicator light. 1500 watts, UL listed.Available In Stock. |
